Let’s talk brightness. It’s an industry buzz word and taken into heavy consideration when building or retrofitting an illuminated sign, but do you know how to effectively measure it?
A lumen refers to the light emitted from a module or bar, while LUX is the reading of actual light transmittance at the sign face. The difference in definition can be the distinction between perceived brightness and actual brightness.
There are two big players that contribute to sign brightness: cabinet depth and lens opacity.
Cabinet Depth
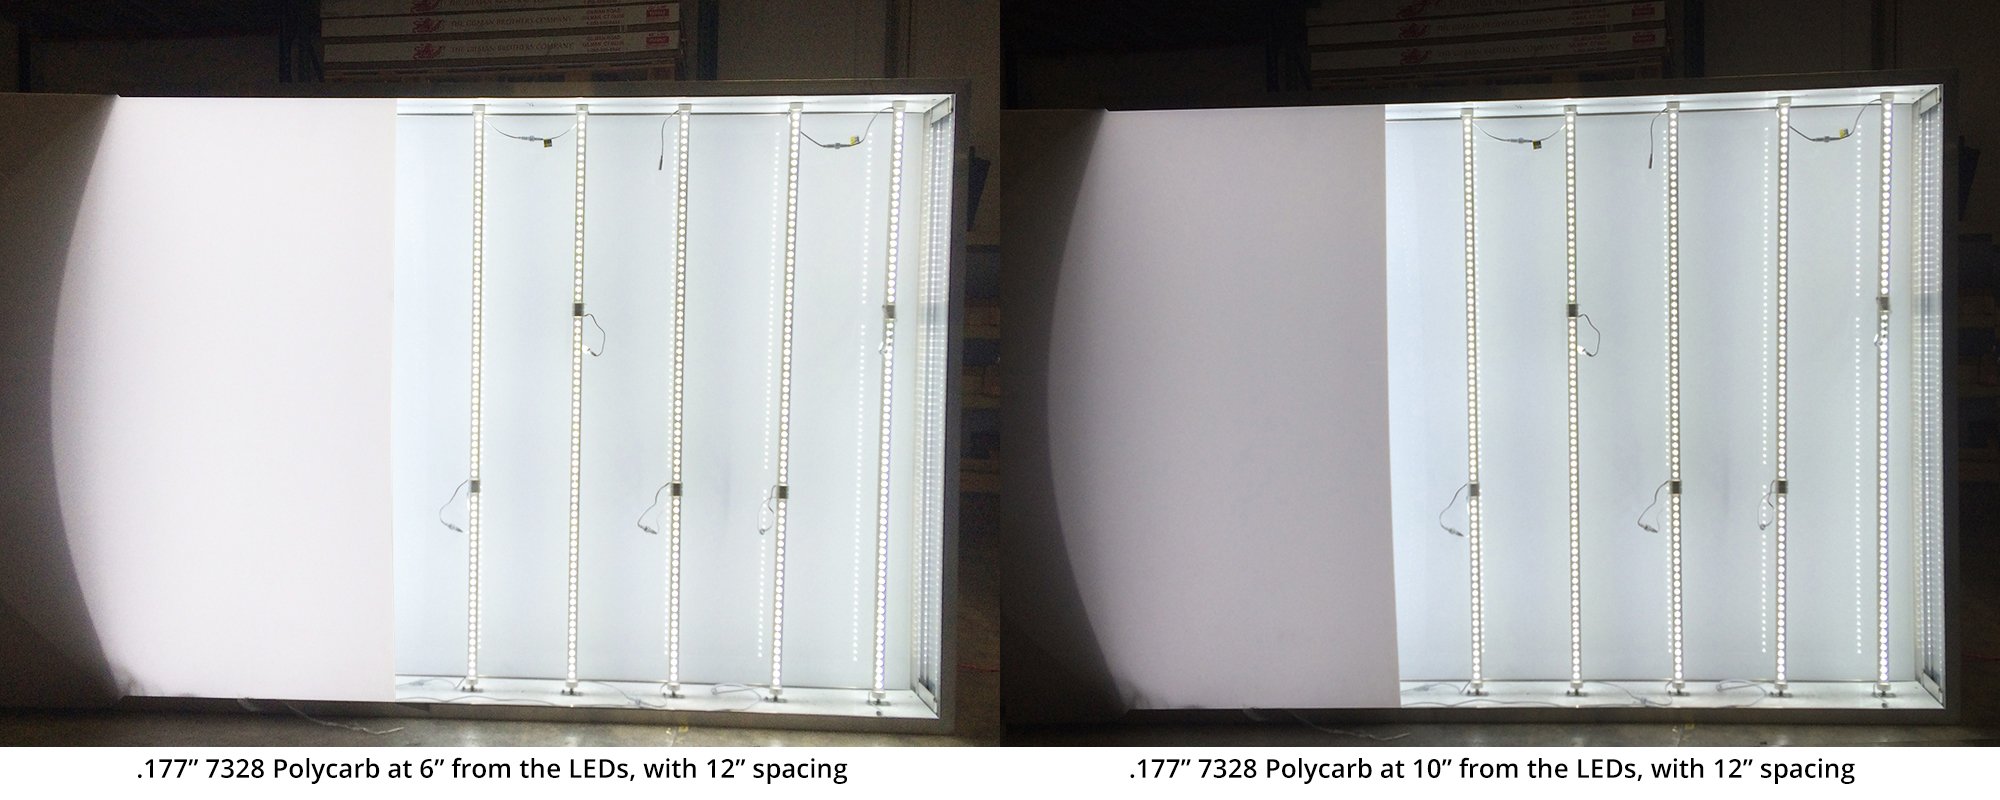
The deeper the cabinet, the less of the lumen total reaches the sign face. When modules are set farther back, their reach is not as intense, thus influencing the brightness independent of the actual lumen count.
There are two ways to combat this depth issue. One way is to move the LEDs closer to the face without causing hot spots. Spotting can be avoided with wide angle lenses. Another way is to increase the number of LEDs inside the sign, essentially increasing the number of bulbs punching light to the face. Finding the perfect balance between moving LEDs closer to the face without causing hot spots or having to increase the number of LEDs, gives you the best of both worlds. We call this "the Sweet Spot".
The Sweet Spot
So how do you find that "Sweet Spot".....that glorious point where cost and aesthetics meet? It’s essentially looking for the most cost effective way to illuminate a sign, without sacrificing LUX at the face. By moving your LEDs away from the face, you can increase the required spacing between them, thus reducing the number of LEDs needed to illuminate the sign without hot spots. However, doing so decreases your LUX at the face. So, although some LEDs have the benefit of being spaced further apart, sacrificing the look of the sign can be a challenge. On the flip side, many people are trying to make shallower and shallower signs. Although this is great for aesthetics, it can create two problems: 1) It often requires tighter LED spacing, thus more LEDs to avoid hot spots and 2) It might increase your total LUX at the face because you've added so many lumens that it pushes the LUX at the face overboard.
So when designing your signs, have an idea of how bright you want your sign at the face (LUX). Then determine how far from the face you can be, while using the least number of LEDs, without sacrificing brightness (Sweet Spot). Often times your module choice can make a difference, maybe a slightly dimmer or slightly brighter module is what you really need.
For example: HanleyLED's PhoenixNRG family has 4 different modules. Each one is made up of the same components (same lens, same casing, same LED chips and therefore the same binning), but can be used differently depending on the need. If PhoenixNRG II modules (PE-2) are your everyday module, a shallow cabinet will produce too much Lux at the face. You can step down the ladder to the lower lumen PhoenixNRG I (PE-1), and get the same color, same great look, just less lux at the face. Or, if your go-to PE-2 works at 10" depth, but just isn't bright enough, you can climb the ladder to the PE-3 to flood more brightness into the sign.
Lens Opacity
The type of translucent acrylic used, influences the approximant percentage of light that gets through. Regardless of lumens, the opacity effects LUX count, which will be the better indicator or brightness.
For example: 7328 White translucent acrylic allows approximately 25% of the light to get through, whereas 2447 White allows approximately 50% of the light to get through. Moreover, even different brands of 7328 White acrylic can have different translucent characteristics. This creates a difference in lux count, despite both scenarios having the same lumen count.
Brightness at the Face
There are no cookie cutter equations for figuring out a standard for your customers. As mentioned above, there are other internal factors that come into play and vary greatly form project to project. It’s difficult, if not impossible to keep track of all light diffusion characteristics of different acrylic and polycarbonate. For this reason, creating your own standard for brightness will greatly reduce the amount of "test and approve" work that happens from one custom job to the next. One method that we like to follow is "Lumens Per Cubic Inch".
The most common varying factor from one custom sign to another is the "sign depth", which directly impacts how far your LEDs are from the face and the cubic inches that the light will bounce around in before escaping through the face. Creating a consistent "Lumens Per Cubic Inch" measurement allows you to employ the same standard to every sign, regardless of size and depth. This speeds up your estimating time and provides a standard for your production team to follow, ultimately increasing the chances that every sign on your production floor leaves with your LEDs positioned in the sweet spot. This consistent look then defines the quality you produce.